About the App

An Introduction to Shortcuts for Mac

In this year’s macOS release, Apple finally brought the Shortcuts app from iPhone and iPad to the Mac. We immediately knew what a game changer this would be for Mac users looking to automate their workflows. That’s because Shortcuts is accessible by design, yet powerful with the right setup. So naturally, we jumped on board and added initial support for Shortcuts in Diagrams 2.2 in the form of three shortcut actions.

If you’ve never heard about Apple’s Shortcuts app, let us introduce you to the new world of automation on Mac.

What Is Shortcuts?

Shortcuts is a preinstalled app that allows you to create so-called shortcuts, which are configurable sequences of actions that perform a certain task. Setting up shortcuts is almost like programming, but it’s way more approachable because it’s all visual and you don’t have to write any code — though you can, if you wish. How complex or straightforward the operation sequences you create are is really up to you. And the best thing is that Apple deeply integrated Shortcuts into the system, which brings your automation actions to the next level.

You can create shortcuts from scratch, import examples from Apple’s gallery, or download them from the internet. In fact, we prepared a bunch of sample shortcuts we think you might like. You’ll find them at the end of this post.

All the shortcuts in your library are synced across all your macOS, iPadOS, and iOS devices via iCloud. And, of course, after importing a shortcut into your library, you can further tweak and remix it according to your needs. Read on to learn how this works.

How to Create Useful Shortcuts

The system offers a wide range of building blocks in the form of actions such as choosing an option from a menu, counting things, changing settings, opening files, and so much more. These actions can be found in the sidebar of the editor and arranged into a sequence via drag and drop. Every installed app — be it Apple’s or a third-party one — can offer more actions as well. You can see the actions of all your apps in the sidebar when switching to the Apps tab.

That’s where Diagrams comes into play. Starting with version 2.2, we offer three actions you can use in your workflows. These actions allow you to work with Diagrams’ documents — for example, to export files without opening the app. The export step can be chained with additional actions to process the outputs — e.g. to save, further manipulate, or upload them, to name a few options.

But how do you trigger your created shortcuts? The simplest way is to activate them inside the Shortcuts app. Performing a workflow with multiple steps using one simple click is already pretty powerful. Though, like mentioned before, the true power of Shortcuts comes with the deep system integration!

Integrate Shortcuts into macOS

Depending on your goal, it’s possible to choose from different combinations of triggers for each shortcut. This allows you to work with your shortcuts in various places.

For example, why don’t you trigger a shortcut that creates a new Diagrams document with your favorite palette preset via a systemwide keyboard shortcut? This way, regardless of what you’re doing right now, you can simply press that keyboard shortcut, and the system will perform your actions. In a similar fashion, you can also opt to display your shortcuts in a dedicated menu bar item, like you can see above, and run them via a mouse click.

And then there are Quick Actions, which are a powerful way to integrate your shortcuts into Finder or other applications on your Mac. Let’s look at those next.

Getting Inputs

By configuring your shortcuts with Quick Actions, you can make them receive inputs from different sources throughout the system, like selected text or documents on your disk. There are three options: Finder integration, listing in the service menu, and buttons in the Touch Bar. The rest of this section will cover the first two.

The Finder Quick Action adds a shortcut to both the information panel and the context menu and passes the selected files to it when triggered. It allows you to design workflows such as creating a new document with the palette of a selected file. Simply select a file, run the shortcut, and save a lot of time!

The service menu is a feature that dates back to the first version of macOS. It’s accessible via either the app menu (to the right of the  button) or by right-clicking text or files. Previously, the system and third-party apps could offer custom actions here. Starting with macOS Monterey, you can list your shortcuts by enabling the appropriate option in the sidebar of the editor. You can change the actions that appear in the service menu via System Preferences > Keyboard > Shortcuts > Services.

Based on the configured input type (text, documents, folders, URLs, etc.), macOS shows only the shortcuts relevant for the current context, ensuring a smooth workflow.

That’s enough theory, don’t you think? Let’s get a bit more practical.

Shortcut Examples for Diagrams

Diagrams 2.2 ships with three actions you can use in your workflows: 

  • Create Document with Palette Preset 

  • Create Document with Palette from Existing Diagram 

  • Export Document

While it’s only the beginning of automation support, these actions already allow you to build powerful timesavers. To give you an idea of what’s possible, we’ve compiled a handful of samples you can play around with. Click the cards below to download them to your Mac.

Please note that you might run into an issue when importing shortcuts, causing the Finder Quick Actions setting to be reset. You might want to reenable this option in the sidebar for some shortcuts to get the most out of them.

This shortcut is made for those of you who like to have their own palette template library. A Diagrams template file is simply a document with a custom palette, and it doesn’t have to contain an actual diagram, but it can. Check out our sample diagrams if you’re looking for inspiration. Now, place your template files in a folder, select this very folder in the shortcut, and you’re all set.

Each time you start the shortcut, you can choose from those templates to create a fresh new document with your palette ready to go.


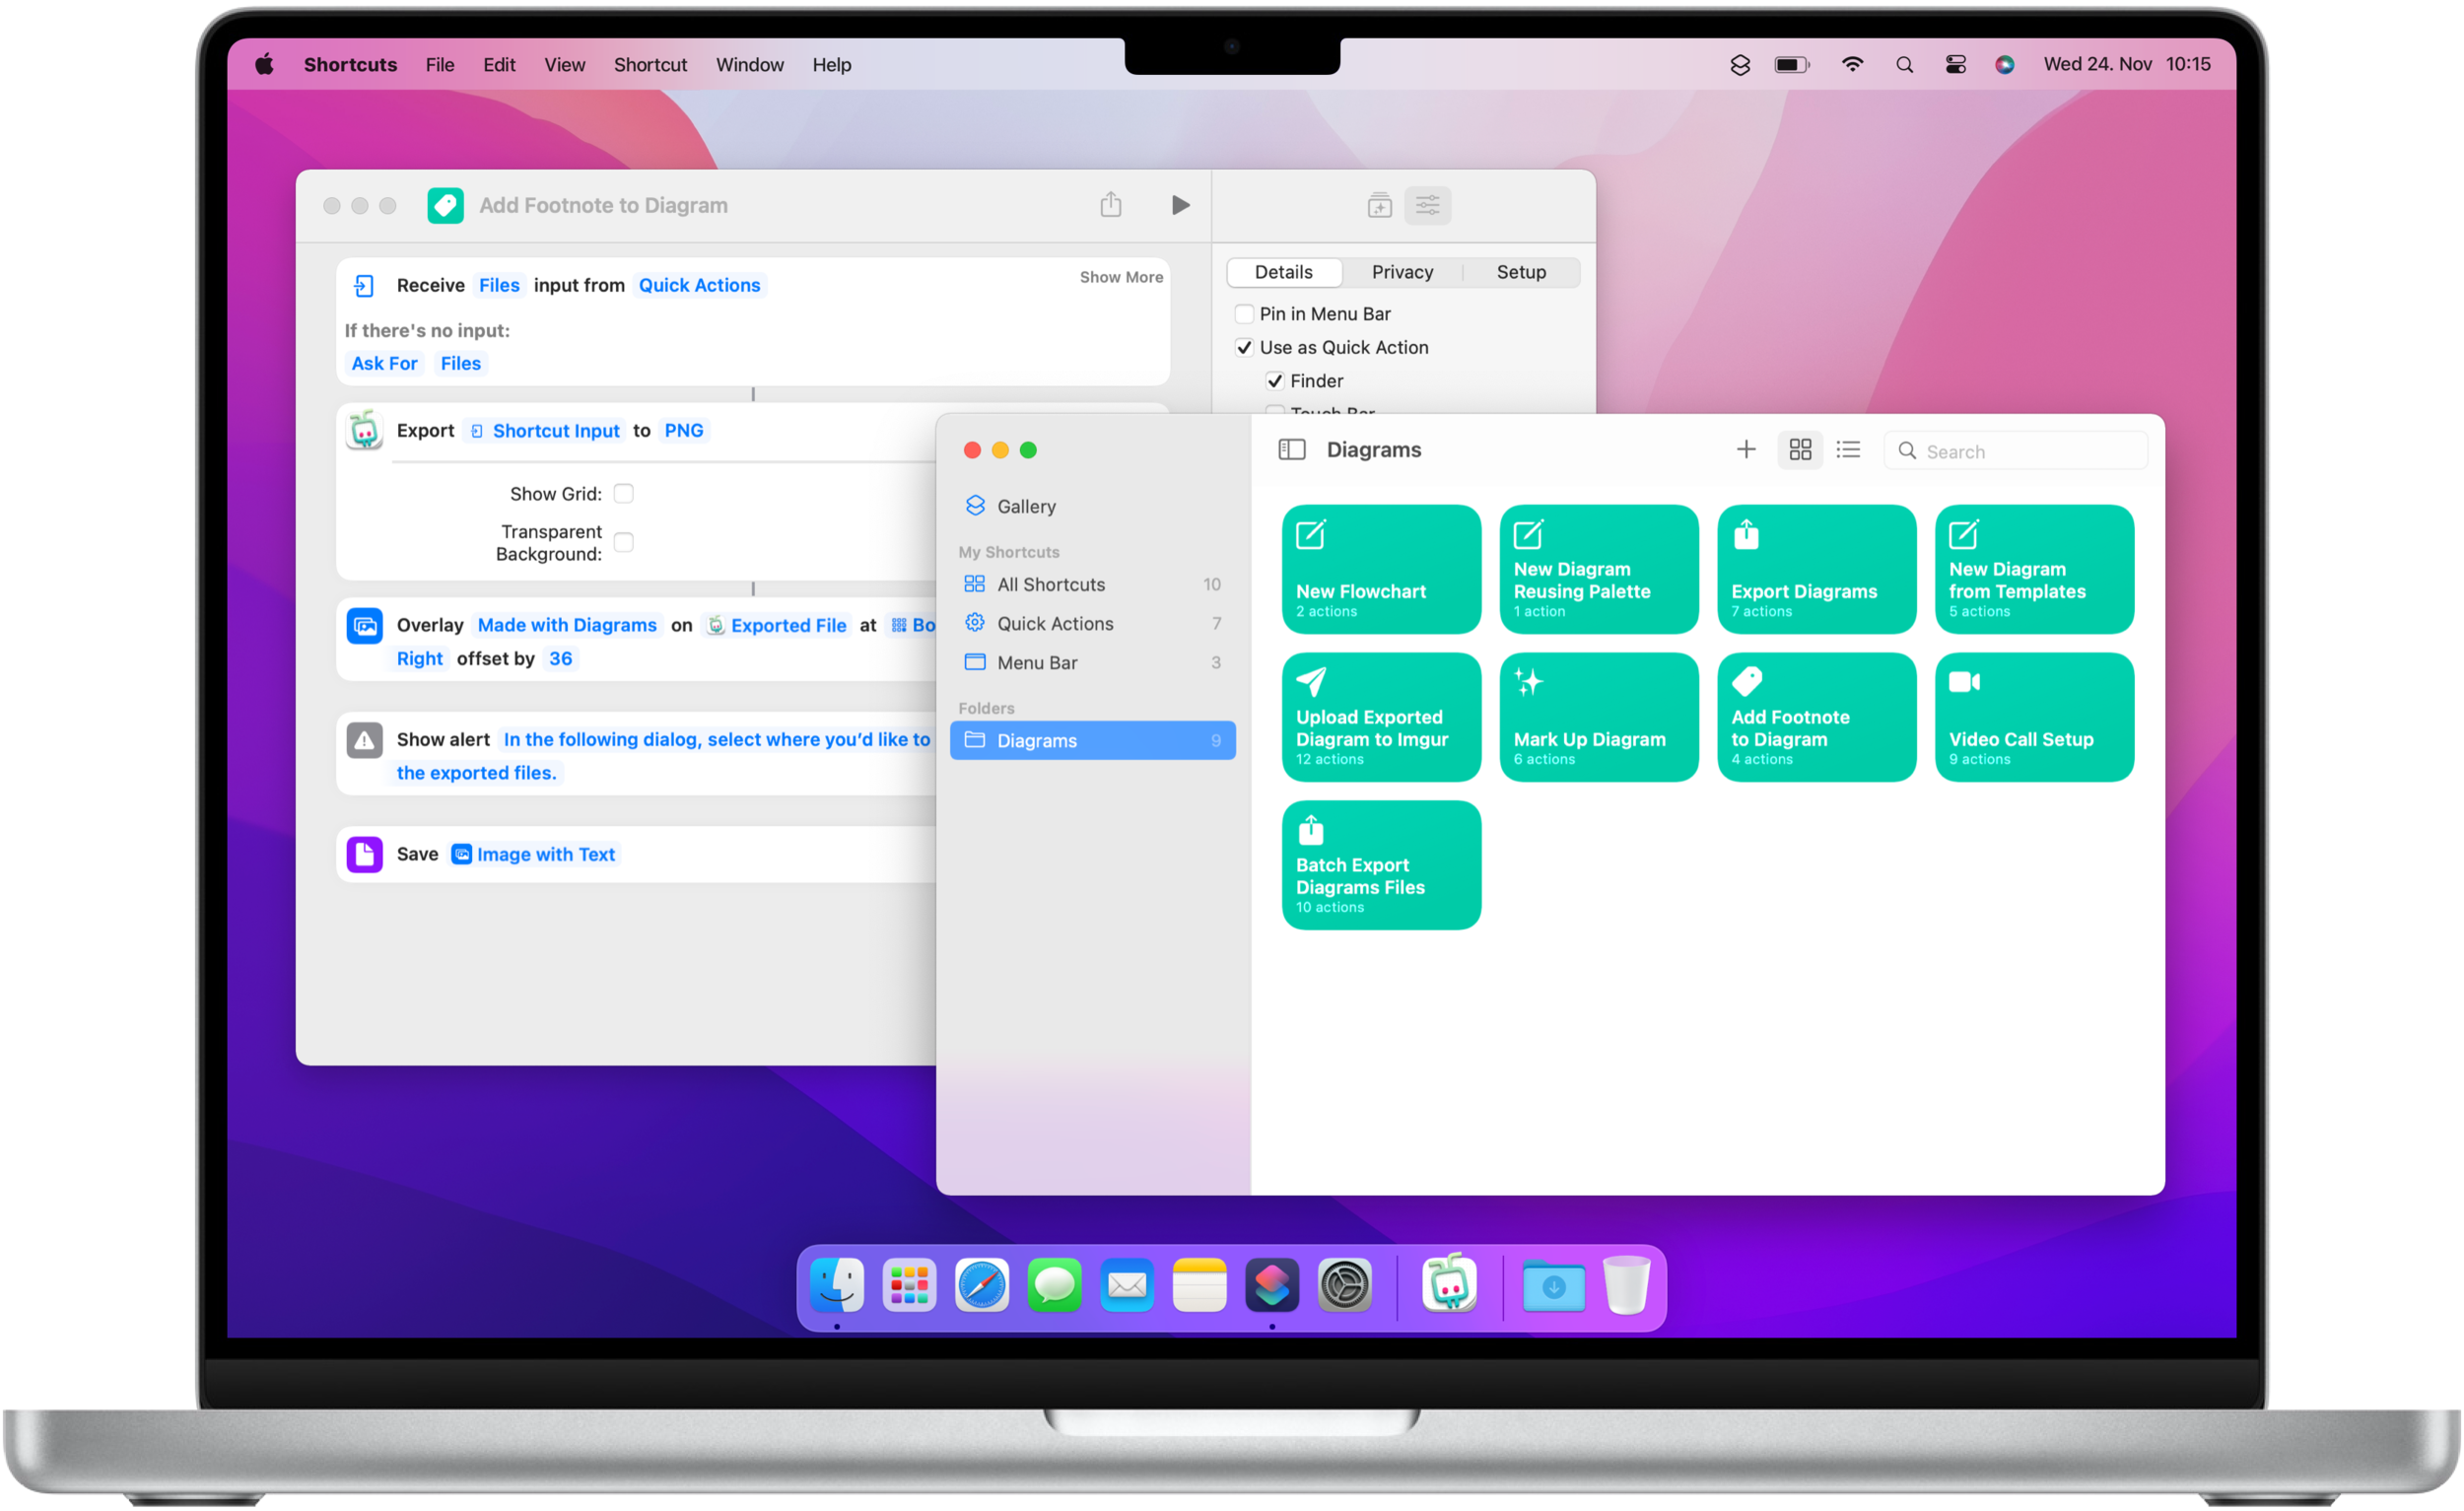
Previously, adding footnotes required postprocessing in a separate program. With this shortcut, you can skip this step and create footnotes automatically. For example, maybe you want to go for a copyright note that always stays the same. However, if you prefer to choose a text each time, select Ask Each Time for the text value in the overlay action (via right-click). Or how about adding the current date via a magic variable? Get as wild as you want!


Do you want to highlight certain things in a diagram or enrich it with notes? This shortcut will quickly export a Diagrams document and open the system dialog for making annotations. After you’re done, the result will be saved on your desktop — or in any other location you like.


Do you often share diagrams with others? Then this one is for you. All you have to do is select the Diagrams document and let the shortcut do the work. It’ll automatically export your diagram and upload it to Imgur, a free image hosting service. The URL of the uploaded image will then automatically be copied to your clipboard, ready to be pasted in your conversations.


With everyone working from home, video calls with friends or colleagues are part of our daily lives. Why don’t you use a shortcut that sets up your machine and apps to see and hear everyone well? To kick off your meeting, you might want to take notes in a new Diagrams file. 😉


Since introducing the Examples Library on our website, we’ve had to manually export each sample diagram to both the PDF and PNG formats from within the app, for every update. This process was tedious — but not anymore! With this shortcut for batch exporting a set of Diagrams documents, we’ve been able to simplify it. If you happen to export multiple diagrams at once, you should check this one out.

Final Words

We hope we managed to give you a general introduction and overview, along with some inspiration for building your own shortcuts. However, there are still plenty of details to learn about. We suggest starting with Apple’s official guide for Shortcuts on Mac.

If you want to dive deeper and become a true automation master, you might want to check out the What’s New in Shortcuts newsletter published by Matthew Cassinelli, a former developer of the Shortcuts app. Another great learning resource with tips and tricks is David Sparks’ Shortcuts for Mac Field Guide.

And last but not least, if you’re looking for more third-party apps that support Shortcuts, you should check out this editorial story on the Mac App Store. In addition to Diagrams, it lists more than 50 apps across all categories. You can get these apps directly from the page, and then it’s only a matter of enabling their shortcut actions and integrating them into your workflows to make them more powerful.

We’re eager to hear about your Shortcuts creations! Feel free to tweet them to us. And as always, we’re happy to hear any feedback and ideas from you.

Happy automating!

A Guide to Palettes

Diagrams 2.0 Macaw, the biggest update to our app, has just been released. In addition to optimizations for macOS Big Sur and Apple Silicon Macs, it introduces a lot of new functionality. In this post, we’ll explore the most significant addition: palettes. For a detailed overview of all features and improvements, please head over to the release notes.

Getting Started

Up until now, Diagrams let you pick from a fixed set of shapes and colors for elements and arrow types for relationships. Over the past few months, we’ve received plenty of requests from you, our users. The message was clear: You want more flexibility. And we heard your feedback and agreed that the single static palette was simply too restrictive. That’s why we removed this limitation with Diagrams 2.0, and for the first time, enabled each of your documents to have its own different palette.

We’ve mentioned the term “palette” a few times already, but what do we mean exactly? Let’s take a closer look. A palette is a collection of element and relationship types. Every document contains exactly one palette, which is specified upon document creation and can be further adjusted. Each type within the palette encodes a meaning and visual appearance for diagram objects it’s applied to. The association between an element or relationship and its type is permanent, meaning that changing the attributes of a type affects all objects associated with that type. Pfff, do these definitions sound overwhelming? Then let’s get more practical.

Getting-Started.png

When you create a new document, you’re asked to select a palette. There are multiple options, and you can choose the one that best fits your use case. The most straightforward way is to start with one of the three built-in palette presets (A): Universal, Grayscale, or Flowchart. Another option is to start with an empty palette and build your types later (B).

Once you’ve created a few documents with custom palettes, you can leverage a third option and load a palette from an existing document to reuse it in a new document (C).

Palette Customization

After a document is created, you can start constructing a diagram using types from the palette you selected, but you can also customize the palette to fit your needs. You can add new types, remove unnecessary types, or change the appearance of existing types. There’s a new palette customization interface for this purpose, which is accessible from the toolbar (Palette), from the main menu (Palette > Customize Palette…), or via Cmd+1.

Palette-Customization.png
  1. List of all element or relationship types

  2. Create and remove types

  3. Indicator of change

  4. Preview of selected type

  5. Optional title of selected type

  6. Visual attributes of selected type

  7. Indicator and details view listing all changes from the session

The left pane lists all available element or relationship types, depending on the tab selected in the top bar. The selected type is reflected in the right pane; it shows a preview and allows you to name it and configure its visual attributes.

While many of the preexisting visual attributes were brought over from Diagrams 1.0, with Diagrams 2.0, we’ve introduced a bunch of new ones as well. When it comes to elements, you can set the shape, color, and text in the caption. And in the case of relationships, you can set the line style, configure arrow heads separately at each of the ends, and format the label.

Once you’re done editing the palette, you can apply changes and save them in your document. This workflow is efficient when performing a multistep customization of the palette, as it allows you to make all changes at once. However, you can also access type editing directly from the canvas.

For example, when adding a new element via a double-click on the canvas, you can click the “+ New” button and create a new type using a familiar interface. The ability to create or edit types on the fly while working on your diagram keeps you from interrupting your flow.

Palette-Customization-2.png

Creating Custom Palettes

With all these preset options, you might be wondering why you’d ever want to start with an empty palette. What’s the point of creating a diagram with no types at hand? Well, starting with a clean slate gives you the freedom to build your palette as you go while working on a diagram at the same time. Moreover, this approach makes it possible to craft a personalized palette that isn’t cluttered with types you don’t need.

Creating a palette from scratch might be the right approach when you have a specific idea in mind or you want to build a diagram one step at a time. Depending on your use case, you might be better off starting with a preset, quickly outlining the diagram, and converting the types from the preset to an organized palette. If you’d like to work in a more freeform manner, you can simply use one of the generic presets and disregard the palette logic.

Embracing the palette, organizing your types, and giving them meaning by naming them comes with many benefits. Not only do your diagrams become better structured and more consistent, but the ability to reuse your types makes you faster and more efficient. This is even applicable across multiple documents, since you can reuse your personalized palettes in new documents.

Now that we’ve covered the theory, let’s talk examples for a moment. The image below shows a variety of palettes. Along with the Flowchart palette that’s available as a built-in preset, you can find palettes extracted from diagrams in our examples library. If you’re looking for a source of inspiration, go check them out.

Create-Custom-Palettes.png

It’s completely up to you if and how you configure your palettes. Diagrams doesn’t dictate which palettes to use or how exactly to organize your types. It does give you tools and just enough freedom to get creative. We believe this unique approach is ideal because our users come from different domains and have different use cases, and our app caters to all those possibilities. The “one-size-fits-all” rule doesn’t always apply.

Where Does This Lead?

If you’re coming from Diagrams 1.0 and you were a true fan of its simple nature, don’t worry. While we made the app more powerful, we tried to keep the palette functionality as unobstructive as possible. Enriching the app’s capabilities without compromising on simplicity is a general principle we strive for, and we think we delivered on it this time.

You might be surprised to discover we didn’t introduce an inspector sidebar that would enable changing attributes directly on the canvas selection. This pattern, which is common in apps that are seemingly similar to Diagrams, doesn’t fit with our semantic approach or our overall vision for the app. We see Diagrams as a diagramming app that supports you primarily when working in a structured manner.

That being said, we see a lot of possibilities of how to expand on the new palette functionality. While you can already import palettes from existing documents, it’s certainly possible to build a general import/export for palettes or even add support for storing your palettes as presets. Now that the visual attributes of element and relationship types can be set individually, there are so many directions we could take this, and boy, do we have a lot of ideas!

With version 2.0, the app has made a major step toward its maturity, but there are still many fundamental features we’d like to add, especially related to the canvas and system integration. The work on the palette kept us busy over the past couple of months, and we’re now ready to continue focusing on our roadmap. But we can assure you that Diagrams has a brighter future than ever. To follow along on our journey, you can find us on Twitter or subscribe to our newsletter. Until next time!

Yet Another Diagramming Application

People often tell us they know other solutions on the market that do something similar to Diagrams. They are right, those tools indeed do something similar. So why are we building yet another diagramming application?

Because Diagrams differs in a few fundamental aspects which have the potential to change the way people create structured diagrams. In this post, we are going to briefly introduce them to you.

Meta-model

We believe that diagram types with different layouts require different interactions. Supporting all possible diagram types in one application would mean dropping to the least common denominator of the interaction model and this would be a suboptimal solution.

This is why Diagrams supports only “structured diagrams” which are based on graphs. To put it simply, these are diagrams which consist of boxes (elements) connected with lines (relationships). This meta-model is universally applicable to a variety of diagram types like class diagrams, network diagrams, flowcharts, organizational charts, and many more.

diagram-objects.png

Building upon this meta-model allows for interactions which are leveraging the specifics of elements and relationships. Among other things, this means that relationships stay connected to elements when moved.

Zero Distractions

Here is what we have figured out: Most tools out there are packed with tons of features. They attempt to support as many individual options and special use cases as possible. In our eyes, these are nothing but distractions. They keep you from focusing on the content of your diagram.

Even worse, those features create room for fiddling around with fine configurations of pixel sizes, layouts, colors, fonts, and so on. Although these settings are useful for graphic designers, they are certainly useless when creating structured diagrams.

This is the reason why Diagrams has no inspector pane on the right side of the application window, leaving more space for the canvas and therefore for your focused work. It’s almost like drawing on a paper.

Rethought Workflow

A lot of effort was put into designing the diagramming workflow right from the beginning of the development. For us, workflow optimization is all about speed, intuitive interactions, and standardization.

Canvas

We truly believe in the visual nature of diagramming as we think that automatic generation of diagrams can never reach the same quality level as a human can produce. This is why an interactive canvas plays an essential role in the diagram creation process. The canvas is the entry point into the application and we’ve equipped it with streamlined interactions to make diagram editing a joy.

Furthermore, the canvas leverages a grid which simplifies the layout as it is used to align the elements and relationships in the diagram. It prevents you from losing focus by fiddling with alignments and size adjustments. This feature is so essential that it sits at the core of the application and it is reflected in most canvas interactions.

There is also no need to set the size of your diagrams manually. Just grow them as big as your structures demand. Diagrams has an infinite canvas which will adapt to the size of your diagram.

Semantics

Diagrams follows a, what we call, “creational approach”. This means that instead of applying random visual attributes to generic shapes you pick the types for your elements and relationships from a palette at the time of their creation. Each type defines the visual attributes which leads to ensured consistency among all its instances.

palettes.png

This might sound like a minor change but it’s actually a deal breaker as this approach allows working in a semantic manner. When working on a diagram of a particular type the palette would show only the relevant element and relationship types from which you can choose. So if you are creating a class diagram, for example, you’re actually adding a class element and an inheritance relationship instead of a rectangle with a text field and a line with a non-filled arrowhead.

Native Application

Last but not least we believe that only native applications can deliver the user experience you deserve. We don’t compromise in this regard and therefore we’re building a native application which feels at home on macOS.

Stay Tuned!

Hopefully, we could illustrate that we’re doing everything we can to help your brain stay focused while removing clutter at the same time. That’s how we understand the user experience.

There is more to show. We can’t wait to share some more in-depth insights with you during the next months. The further we are in development, the more details we will be able to talk about.

But for now, let’s get back to Xcode.